How to create a brand mascot with AI
A brand mascot is one of the most memorable assets you can have — it shows up on merch, social posts, packaging, and everywhere your brand lives. With Poster, you can go from zero to a finished mascot in a single afternoon, even if you have no design background.
Here's the exact workflow.
Step 1: Find your style inspiration
Before you generate anything, collect a reference. This is the single most important step — it gives the AI a clear visual anchor and saves you many rounds of iteration.
Look for a mascot or illustration style you genuinely love. It could be:
- A character from a game, cartoon, or sticker pack
- A competitor's mascot that has the vibe you want but needs to be made yours
- Any illustration style — flat vector, chunky 3D, retro pixel art, hand-drawn
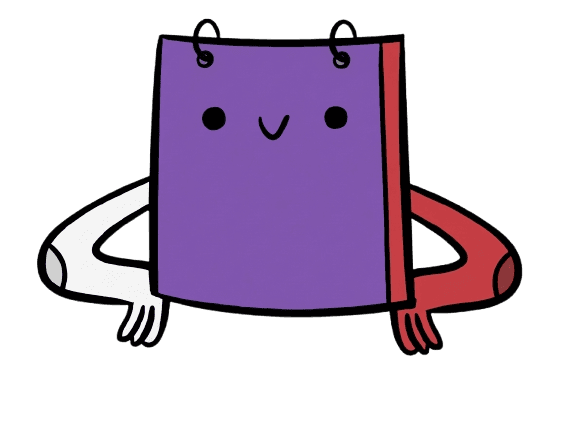
Here's the kind of reference we used as a starting point:
Save that image. You'll upload it in the next step.
Why it works: The model doesn't need to guess what "fun and friendly" or "bold and edgy" means to you. One image communicates style, color mood, line weight, and character proportions instantly.
Step 2: Upload and iterate in Image Generation
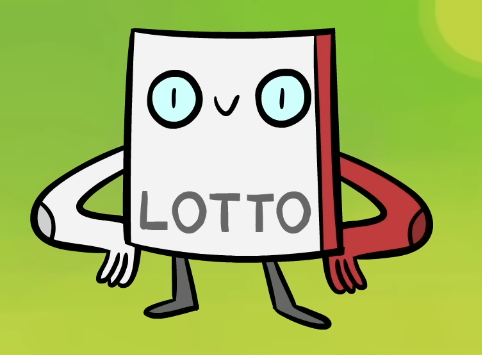
Head to Image Generation in Poster and upload your inspiration image as the input.
Now describe what you want to change or create:
- "Create a mascot character with a similar cartoon style — make it a fox with a confident pose"
- "Same flat illustration style but redesign as a bear wearing a hoodie, holding a coffee cup"
- "Keep the chunky outline style, create an owl mascot with big expressive eyes"
Hit generate. If the first result is close but not quite there, use Tune to refine one detail at a time:
- "Make the eyes bigger and more expressive"
- "Simplify the outline — fewer details, cleaner shapes"
- "Give it a more confident, forward-leaning stance"
Tune is faster than regenerating from scratch — keep adjusting until the character feels right.
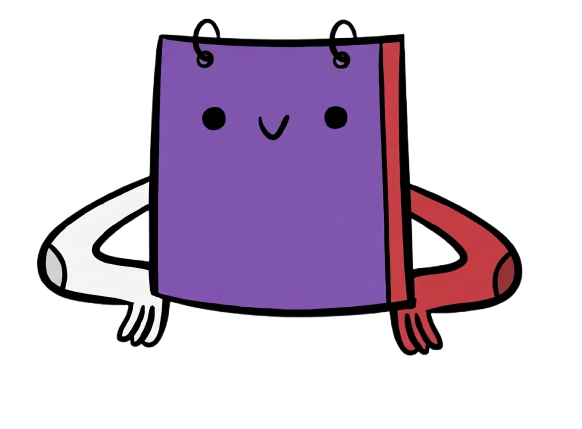
Step 3: Lock in your color palette with AI
A great mascot needs a color palette that works with your brand. If you already have brand colors set up in Poster, select your brand in the Tune panel and apply them directly.
If you're starting fresh, ask the AI to help:
- "Suggest a color palette for this mascot that feels energetic and playful — 3–4 colors max"
- "Apply a muted, earthy color palette — warm browns, terracotta, sage green"
- "Recolor using a bold, high-contrast palette: deep navy, electric yellow, crisp white"
Once you have a palette you like, apply it through a Tune instruction:
- "Recolor the mascot using these colors: [your hex codes or color descriptions]"
This step makes your mascot feel intentional and brand-specific rather than generic.
Step 4: Remove the background
The last step is getting a clean, isolated version of your mascot — no background, ready to drop into anything.
Use any background removal tool (most design tools and many free online tools support this), or ask Poster to generate it on a transparent or solid white background from the start:
- "Render the mascot on a pure white background — no texture, no shadow"
- "Generate on a transparent-style background with no environment elements"
Once the background is removed, export your mascot. You now have a versatile asset you can use:
- As a profile picture or avatar
- On social media posts, stories, and banners
- On product packaging, merch, or stickers
- Anywhere you want your brand to have a face
The whole process — inspiration, generation, color, background removal — takes under an hour. The key is starting with a strong visual reference and iterating in small, focused steps rather than trying to get everything right in one prompt.